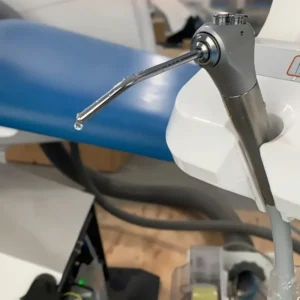
The dental air water syringe, often referred to as a dental three way syringe, is one of the most frequently used instruments in any dental operatory. Whether dentists are rinsing debris, drying tooth surfaces, checking restorations, or improving visibility during treatment, the air water syringe is used countless times throughout the day.
Because of its high-frequency use, the syringe is also one of the dental chair components most likely to develop performance issues over time. Problems such as a dental air water syringe leaking, weak spray pressure, blocked water flow, or a dental syringe button stuck can affect treatment efficiency and create frustration for both clinicians and patients.
Fortunately, most dental air water syringe problems can be diagnosed and repaired quickly when the root cause is correctly identified. In many cases, simple maintenance procedures or the replacement of inexpensive wear parts can restore the syringe to full working condition.
This comprehensive Dental Air Water Syringe Troubleshooting Guide explains the most common failures, their causes, repair methods, and preventive maintenance practices. Whether you are a dental clinic owner, equipment distributor, service technician, or dental equipment supplier, this guide will help you understand how to keep your dental air water syringe operating reliably.
What Is a Dental Air Water Syringe?
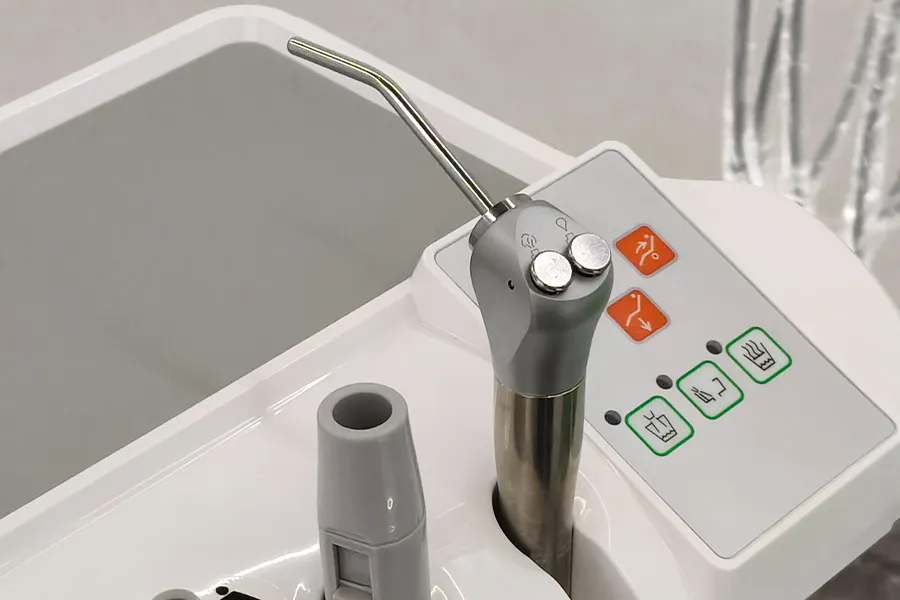
A Стоматологический воздушный водный шприц is a handheld device mounted on a dental unit that delivers air, water, or a combination of both through a removable tip. Most modern syringes feature two buttons:
- Air button
- Water button
When the air button is pressed, compressed air is released through the tip.
When the water button is pressed, water flows through the tip.
When both buttons are pressed simultaneously, air and water mix together to create a fine spray mist that is used for rinsing and cooling treatment areas.
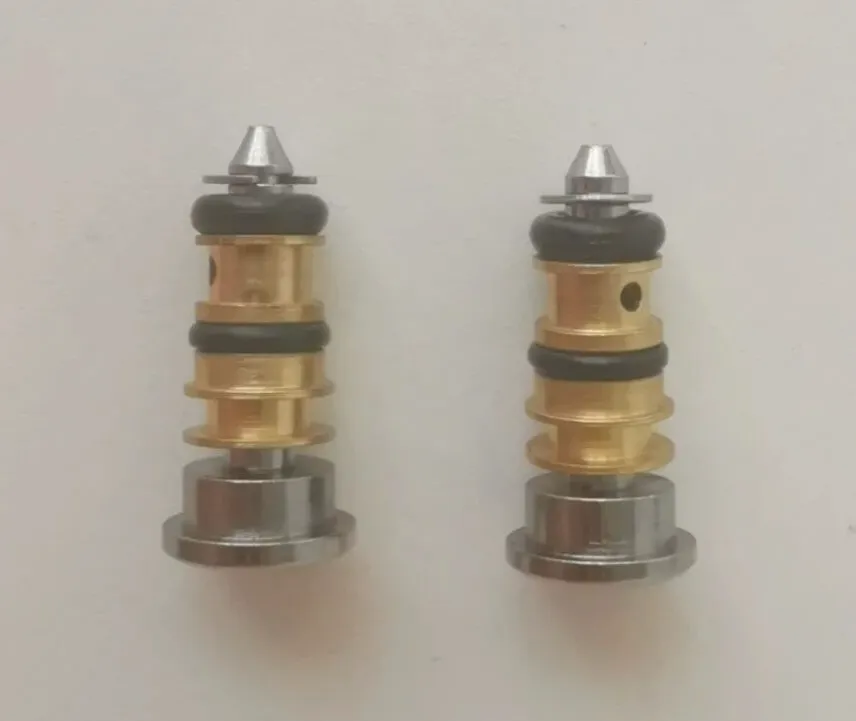
Although the design appears simple, a dental air water syringe contains several precision components, including:
- Air valve assembly
- Water valve assembly
- O-rings
- Springs
- Internal seals
- Valve stems
- Air channels
- Water channels
- Removable syringe tips
Because these components are constantly exposed to pressure, moisture, movement, and contaminants, wear and failure are inevitable over time.
Why Do Dental Air Water Syringes Fail?
Before discussing specific issues, it is important to understand why failures occur.
The most common causes include:
Normal Wear and Tear
A busy dental clinic may use a three way syringe hundreds of times every day. After years of operation, seals and valves naturally wear out.
Hard Water Deposits
Mineral-rich water can leave calcium and scale deposits inside valves and tubing.
Insufficient Maintenance
Without regular cleaning and lubrication, moving parts may become stiff or damaged.
Poor Water Quality
Contaminated water can introduce debris into the system and clog internal passages.
Aging Components
Rubber O-rings and seals deteriorate over time, even when the syringe is not heavily used.
Understanding these factors makes air water syringe troubleshooting much easier.
Problem 1: Dental Air Water Syringe Leaking
A dental air water syringe leaking is one of the most common service calls reported by dental clinics.

Leakage may appear in several different locations:
- Around the syringe tip
- Around the buttons
- Around tubing connections
- Inside the handle
- From the rear of the syringe body
Some leaks are minor drips, while others can significantly affect performance.
Common Causes of Leakage
Worn O-Rings
O-rings are responsible for maintaining a watertight seal inside the syringe.
Over time they may:
- Crack
- Flatten
- Stretch
- Become brittle
Once this occurs, water can escape through gaps.
Damaged Valve Components
Valve seats and valve stems experience repeated movement every day.
As these surfaces wear down, they may no longer seal properly.
Loose Fittings
Water line fittings may gradually loosen due to vibration and regular use.
Cracked Components
Older syringes sometimes develop hairline cracks that allow water to escape.
How to Fix a Dental Air Water Syringe Leaking Problem
- Remove the syringe tip.
- Inspect visible O-rings.
- Check all tubing connections.
- Examine valve assemblies.
- Replace damaged seals.
- Test the syringe under pressure.
In most situations, replacing the seals using a dental syringe repair kit is the fastest and most cost-effective solution.
Problem 2: Dental Syringe Leaking Water Around the Buttons
A special type of dental syringe leaking water occurs around the air and water buttons.
This issue is especially common in older dental units.
Symptoms
- Water appears around the button area.
- Moisture accumulates on the handle.
- Water drips onto the tray.
Causes
Failed Button O-Rings
Each button contains internal sealing components that prevent water from escaping.
Corrosion
Corrosion can damage the sealing surfaces and create leakage paths.
Valve Stem Wear
Excessive wear allows water to bypass the seal.
Repair Method
A proper dental three way syringe repair procedure includes:
- Removing button assemblies
- Cleaning the internal housing
- Installing new O-rings
- Replacing damaged valve stems
Most service technicians recommend replacing all related seals simultaneously to prevent future failures.
Problem 3: Dental Syringe No Water
One of the most disruptive issues in daily practice is when the dental syringe no water function occurs.
Without water delivery, rinsing procedures become difficult and treatment efficiency decreases.
Common Symptoms
- No water output
- Weak water flow
- Intermittent water delivery
- Delayed water response
Possible Causes
Empty Water Bottle
Independent bottle systems must maintain adequate water volume and pressure.
Always check:
- Water level
- Bottle pressure
- Bottle cap seal
Blocked Water Lines
Water lines may become obstructed by:
- Mineral deposits
- Sediment
- Biofilm
- Debris
Faulty Water Valve
Water valves may become:
- Stuck
- Corroded
- Damaged
Clogged Syringe Tip
The tip opening can become blocked by scale or debris.
Air Water Syringe Troubleshooting Procedure
Step 1: Verify water supply.
Step 2: Check bottle pressure.
Step 3: Inspect tubing.
Step 4: Remove and clean the tip.
Step 5: Test water valve operation.
Step 6: Replace faulty components if necessary.
Many cases of dental air water syringe not working are ultimately caused by a simple blockage rather than a major mechanical failure.
Problem 4: Dental Syringe No Air
A dental syringe no air problem prevents effective drying of treatment surfaces.
Symptoms
- No airflow
- Weak airflow
- Intermittent airflow
Possible Causes
Compressor Problems
Insufficient compressor output can affect syringe performance.
Check:
- Air tank pressure
- Regulator settings
- Compressor functionality
Blocked Air Pathways
Dust, debris, and contamination can restrict airflow.
Air Valve Failure
Internal air valves may stick or fail to open.
Damaged Tubing
Air leaks in tubing can reduce pressure.
Repair Procedure
- Verify compressor operation.
- Check pressure readings.
- Inspect air tubing.
- Remove and clean the syringe tip.
- Test air valve performance.
- Replace damaged components.
Many clinics mistakenly replace the entire syringe when only a valve repair is needed.
Problem 5: Dental Air Water Syringe Not Working at All
Occasionally, a dental air water syringe not working condition affects both air and water functions simultaneously.
Symptoms
- No air output
- No water output
- No spray function
Possible Causes
Supply System Failure
Check whether:
- Air supply is active
- Water supply is active
Internal Blockage
Both pathways may become obstructed.
Broken Valve Assembly
A damaged central valve assembly can disable all functions.
Internal Component Failure
Springs, stems, and seals may fail after prolonged use.
Recommended Repair
A complete inspection should include:
- Air supply testing
- Water supply testing
- Valve examination
- Seal replacement
If multiple components are worn, using a complete dental syringe repair kit often provides the most economical solution.
Problem 6: Dental Syringe Button Stuck
A dental syringe button stuck issue is particularly common in clinics with hard water conditions.
Symptoms
- Button remains depressed
- Slow button return
- Increased resistance when pressing
Causes
Mineral Scale Build-Up
Calcium deposits can accumulate around moving parts.
Lack of Lubrication
Dry O-rings increase friction.
Spring Fatigue
Return springs may weaken over time.
Corrosion
Moisture exposure can damage metal components.
How to Repair a Stuck Button
- Remove the button assembly.
- Clean all deposits.
- Replace worn O-rings.
- Lubricate with medical-grade silicone grease.
- Replace springs if needed.
Routine cleaning dramatically reduces the likelihood of a dental syringe button stuck condition.
Problem 7: Poor Spray Quality
Even when air and water are functioning, spray performance may still be unsatisfactory.
Symptoms
- Uneven mist
- Water stream instead of spray
- Excessive splashing
Causes
Partially Blocked Tip
Small obstructions can alter spray patterns.
Incorrect Air-to-Water Ratio
Pressure imbalance affects atomization.
Worn Syringe Tip
Old tips may no longer perform correctly.

Решение
- Clean tips thoroughly
- Replace damaged tips
- Verify pressure settings
- Check air and water valves
Problem 8: Continuous Water Flow
A dental air water syringe leaking continuously after the button is released requires immediate attention.
Causes
Valve Seat Damage
The valve cannot fully close.
Worn Seal
Water bypasses the sealing surface.
Debris in Valve Assembly
Foreign particles prevent proper closure.
Repair Method
- Disassemble the valve
- Remove debris
- Replace seals
- Install new valve components if necessary
Problem 9: Continuous Air Leakage
Continuous air leakage increases dental air compressor workload and energy consumption.
Symptoms
- Constant hissing sound
- Frequent compressor cycling
- Reduced system efficiency
Causes
- Damaged air valve
- Broken spring
- Worn sealing surface
Решение
Most repairs involve replacing the affected valve components.
Problem 10: Air and Water Mixing Improperly
Air and water should remain separate until spray mode is activated.
Symptoms
- Water from air button
- Air bubbles in water mode
- Unstable spray pattern
Causes
Internal Seal Failure
The most common cause is O-ring damage.
Valve Wear
Worn valves can allow crossover between channels.
Repair
A complete dental three way syringe repair should include replacement of all critical seals.
Recommended Preventive Maintenance Schedule
To maximize the lifespan of your dental air water syringe and reduce unexpected downtime, Kinsun Dental recommends implementing the following preventive maintenance schedule.
Daily Maintenance
At the end of each working day:
- Flush the water line for at least 30 seconds to remove debris and reduce biofilm buildup.
- Purge the air line for approximately 10 seconds to remove moisture and contaminants.
- Wipe down the syringe handle and tip with an approved disinfectant.
Weekly Maintenance
Perform the following inspections every week:
- Check the syringe tip for blockages, mineral deposits, or damage.
- Verify that the air and water buttons return smoothly after being pressed.
- Inspect spray quality and ensure proper air-water mixing.
Monthly Maintenance
To maintain optimal performance:
- Lubricate button assemblies and moving components using medical-grade silicone lubricant.
- Inspect all visible O-rings and seals for signs of wear, cracking, or deformation.
- Check for minor leaks around the tip, buttons, and tubing connections.
Every 6 Months
As part of routine preventive servicing:
- Replace critical sealing components and O-rings that experience frequent wear.
- Inspect all air and water connections for leakage or deterioration.
- Verify air pressure and water pressure performance.
Every 1–2 Years
For long-term reliability, Kinsun Dental recommends:
- Replacing the complete dental syringe repair kit, including springs, O-rings, valve stems, and seals.
- Replacing aged or worn syringe tips to maintain optimal spray performance.
- Performing a comprehensive inspection of the entire air-water syringe assembly.
Following a structured air water syringe maintenance program can significantly reduce dental air water syringe problems, extend equipment lifespan, and minimize costly emergency repairs.
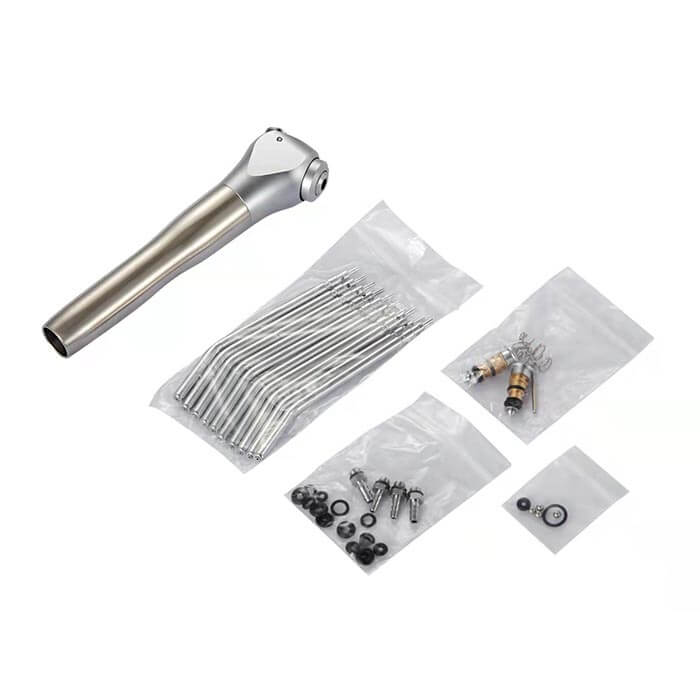
Why Every Dental Clinic Needs a Dental Syringe Repair Kit
Many common failures can be repaired within minutes if replacement parts are available.
A professional dental syringe repair kit typically contains:
- O-rings
- Springs
- Valve stems
- Valve seals
- Retaining clips
- Lubricants
Benefits include:
- Reduced downtime
- Lower repair costs
- Faster troubleshooting
- Improved equipment reliability
For busy clinics and dental equipment distributors, keeping repair kits in inventory is highly recommended.
Best Practices for Extending Syringe Lifespan
To maximize service life:
- Use filtered water whenever possible.
- Follow regular maintenance schedules.
- Replace worn tips promptly.
- Lubricate internal seals periodically.
- Inspect valves before failures occur.
- Train staff to identify early warning signs.
These simple steps can reduce the frequency of dental air water syringe problems and improve long-term reliability.
Заключение
The dental air water syringe is a small but essential component of every dental unit. Because it is used constantly throughout the day, failures such as a dental air water syringe leaking, dental syringe leaking water, dental syringe no water, dental syringe no air, dental syringe button stuck, or a complete dental air water syringe not working condition can occur over time.
Fortunately, most issues can be resolved through systematic air water syringe troubleshooting, proper preventive care, and timely replacement of worn parts. By implementing a structured air water syringe maintenance program and keeping a dental syringe repair kit readily available, dental clinics can minimize downtime, improve treatment efficiency, and extend the lifespan of their equipment.
At Kinsun Dental, we supply high-quality dental air water syringes, syringe tips, replacement dental chair valves, O-rings, and complete dental syringe repair kit solutions for distributors, dental equipment repair companies, and dental clinics worldwide. Whether you need OEM-compatible replacement parts or complete syringe assemblies, our team can help you find the right solution for your dental chair system.